> ## Documentation Index
> Fetch the complete documentation index at: https://moxn.mintlify.site/llms.txt
> Use this file to discover all available pages before exploring further.
# MCP Quick Start
> Connect your AI assistant to Moxn Documents over MCP
This guide walks you through connecting your AI assistant to Moxn Documents over MCP so it can search, read, and write documentation.
For CLI-based setup (API key, no MCP), see [CLI Quick Start](/guides/context-cli).
## Prerequisites
* A Moxn account (get one at [moxn.dev](https://moxn.dev))
* An AI assistant that supports MCP:
* **Web apps**: Claude.ai, ChatGPT, Gemini
* **Cloud environments**: Claude Cowork
* **CLI tools**: Claude Code, Gemini CLI
* **Desktop apps**: Cursor, Claude Desktop, ChatGPT Desktop
**No coding required.** This setup involves copying a configuration snippet — that's it.
## Step 1: Get Your Configuration
1. Sign in to [moxn.dev](https://moxn.dev)
2. Go to **Knowledge Base**
3. Click **MCP Setup** to expand the configuration panel
4. Copy the configuration snippet for your connection type (stdio or http)
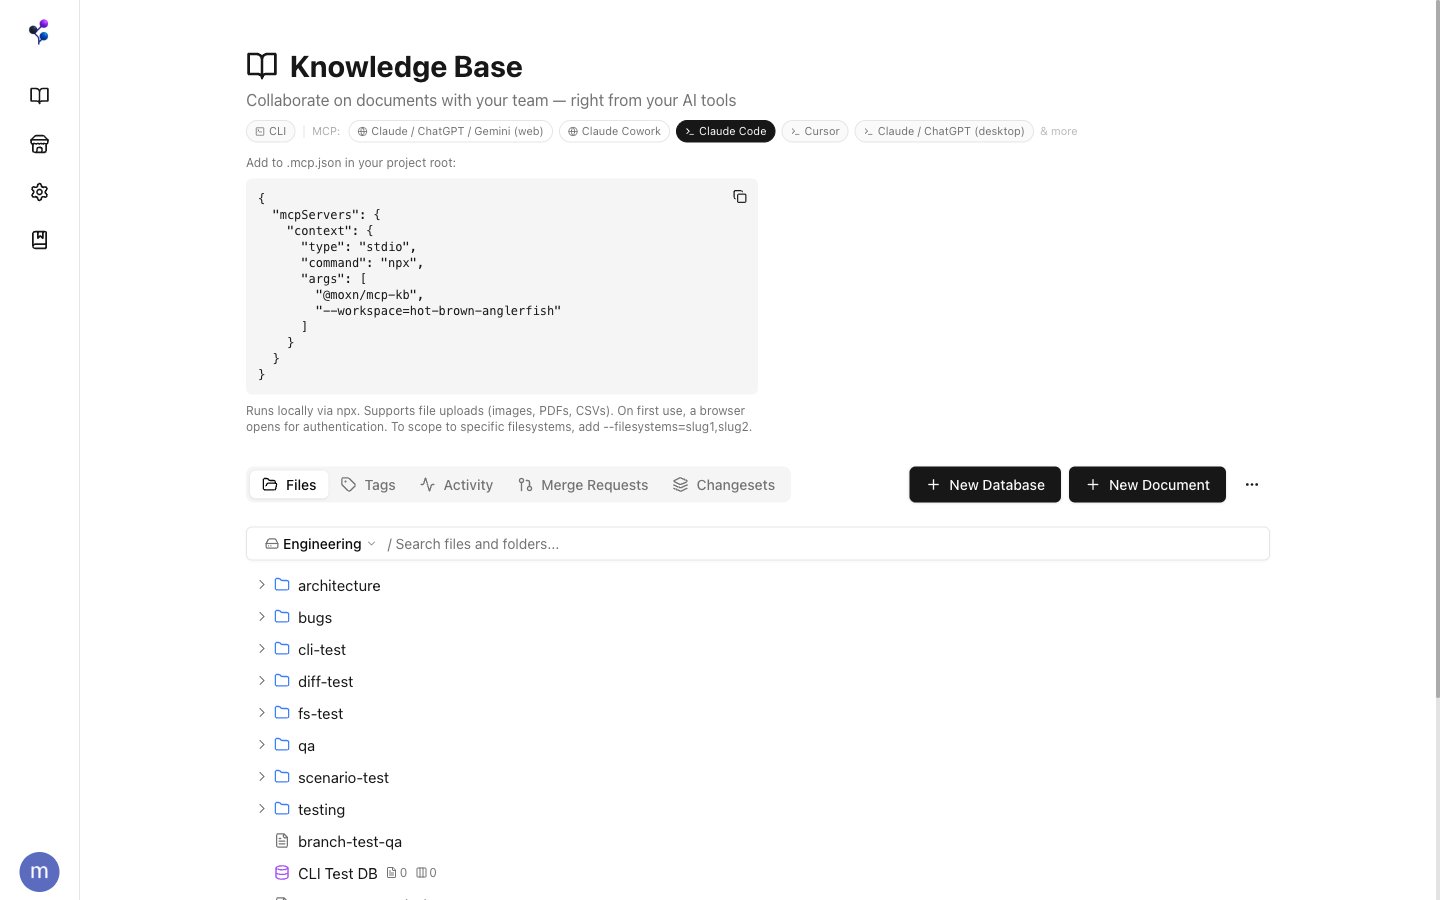 **Local (stdio)** — runs on your machine via `npx`:
```json theme={null}
{
"mcpServers": {
"context": {
"type": "stdio",
"command": "npx",
"args": [
"@moxn/mcp-kb",
"--workspace=your-workspace-slug"
]
}
}
}
```
**Remote (http)** — connects directly to Moxn's servers:
```json theme={null}
{
"mcpServers": {
"context": {
"type": "http",
"url": "https://your-workspace-slug.moxn.dev/api/mcp/http"
}
}
}
```
## Step 2: Add to Your AI Assistant
Choose your assistant below:
Claude.ai supports MCP servers through its Integrations settings.
1. Go to [claude.ai](https://claude.ai)
2. Click your **profile icon** → **Settings** → **Integrations**
3. Click **Add Integration** and select **MCP**
4. Enter the remote URL:
```
https://your-workspace-slug.moxn.dev/api/mcp/http
```
5. Save the integration
Replace `your-workspace-slug` with your actual workspace slug (visible in your Moxn dashboard URL).
Once connected, you can use Moxn tools in any Claude.ai conversation.
ChatGPT supports MCP connectors through its settings.
**Requires a Plus or Pro subscription** with developer mode enabled.
1. Go to [chatgpt.com](https://chatgpt.com)
2. Open **Settings** → **Apps & Connectors** → **Advanced settings**
3. Enable **Developer mode**
4. Click **Create** under connectors
5. Fill in:
* **Name**: `Moxn Documents`
* **Description**: `Search, read, and write documentation`
* **URL**: `https://your-workspace-slug.moxn.dev/api/mcp/http`
6. Save the connector
Replace `your-workspace-slug` with your actual workspace slug.
To use it, click the **+** button in a new chat, select **More**, then choose **Moxn Documents** from your connectors.
**Limitation:** The `upload_url` tool is not fully supported with remote connections. Avoid file uploads when using ChatGPT.
Google Gemini supports MCP through Google AI Studio.
1. Go to [aistudio.google.com](https://aistudio.google.com)
2. Open a project and go to **Tools** → **MCP Servers**
3. Add a new server with the remote URL:
```
https://your-workspace-slug.moxn.dev/api/mcp/http
```
4. Save the configuration
Replace `your-workspace-slug` with your actual workspace slug.
Claude Cowork runs in a cloud VM that cannot execute local commands like `npx`. Use the remote HTTP connection instead:
```json theme={null}
{
"mcpServers": {
"context": {
"type": "http",
"url": "https://your-workspace-slug.moxn.dev/api/mcp/http"
}
}
}
```
Replace `your-workspace-slug` with your actual workspace slug (visible in your Moxn dashboard URL).
**Limitation:** The `upload_url` tool is not fully supported in HTTP mode. Avoid file uploads when using Claude Cowork.
Add the configuration to `.mcp.json` in your project root:
```json theme={null}
{
"mcpServers": {
"context": {
"type": "stdio",
"command": "npx",
"args": [
"@moxn/mcp-kb",
"--workspace=your-workspace-slug"
]
}
}
}
```
Claude Code will automatically detect and connect to the server.
Add the configuration to your Cursor MCP settings:
1. Open Cursor
2. Go to **Settings** → **MCP**
3. Click **Add new MCP server**
4. Add this configuration:
```json theme={null}
{
"mcpServers": {
"context": {
"type": "stdio",
"command": "npx",
"args": [
"@moxn/mcp-kb",
"--workspace=your-workspace-slug"
]
}
}
}
```
Cursor will automatically connect to the server.
### Mac
1. Open Claude Desktop
2. Click **Claude** in the menu bar → **Settings**
3. Select the **Developer** tab
4. Click **Edit Config**
This opens `claude_desktop_config.json` in your text editor. If the file is empty or just has `{}`, replace it with your configuration from Step 1.
If you already have other MCP servers configured, add the `"context"` entry inside the existing `mcpServers` object:
```json theme={null}
{
"mcpServers": {
"existing-server": { ... },
"context": {
"type": "stdio",
"command": "npx",
"args": [
"@moxn/mcp-kb",
"--workspace=your-workspace-slug"
]
}
}
}
```
5. Save the file
6. Quit and reopen Claude Desktop
### Windows
1. Open Claude Desktop
2. Click the **hamburger menu** (☰) → **Settings**
3. Select the **Developer** tab
4. Click **Edit Config**
This opens `claude_desktop_config.json` in Notepad. Add your configuration as described above.
5. Save the file
6. Close and reopen Claude Desktop
### Verify It's Working
After restarting Claude Desktop, you should see a **hammer icon** in the bottom-right corner of the chat window. This indicates MCP servers are connected.
Click the **+** button at the bottom of the chat, then select **Connectors** to see your connected servers.
ChatGPT Desktop uses a GUI-based setup instead of a config file.
**Requires Developer Mode.** You'll need a ChatGPT Plus or Pro subscription with developer mode enabled.
1. Open ChatGPT Desktop
2. Go to **Settings** → **Apps & Connectors** → **Advanced settings**
3. Enable **Developer mode**
4. Click **Create** under connectors
5. Fill in:
* **Name**: `Moxn Documents`
* **Description**: `Search, read, and write documentation`
* **URL**: `https://your-workspace-slug.moxn.dev/api/mcp/http`
6. Save the connector
Replace `your-workspace-slug` with your actual workspace slug (visible in your Moxn dashboard URL).
To use it, click the **+** button in a new chat, select **More**, then choose **Moxn Documents** from your connectors.
**Limitation:** The `upload_url` tool is not fully supported with remote connections. Avoid file uploads when using ChatGPT Desktop.
The Gemini CLI supports MCP servers through its configuration file.
1. Create or edit `~/.gemini/settings.json`
2. Add the MCP server configuration:
```json theme={null}
{
"mcpServers": {
"context": {
"command": "npx",
"args": [
"@moxn/mcp-kb",
"--workspace=your-workspace-slug"
]
}
}
}
```
See the [Gemini CLI MCP documentation](https://geminicli.com/docs/tools/mcp-server/) for more details.
For other MCP-compatible tools, you'll need either:
**Local connection** (if your tool can run `npx`):
```json theme={null}
{
"mcpServers": {
"context": {
"type": "stdio",
"command": "npx",
"args": ["@moxn/mcp-kb", "--workspace=your-workspace-slug"]
}
}
}
```
**Remote connection** (if your tool runs in a VM or browser):
```json theme={null}
{
"mcpServers": {
"context": {
"type": "http",
"url": "https://your-workspace-slug.moxn.dev/api/mcp/http"
}
}
}
```
Not sure which to use? See [Understanding Connection Types](#understanding-connection-types) below.
## Understanding Connection Types
Not sure which setup to use? Here's the difference:
| Type | How It Works | Apps That Use It |
| ----------------- | ------------------------------ | ---------------------------------------------------------- |
| **Local (stdio)** | Runs on your machine via `npx` | Claude Code, Cursor, Claude Desktop, Gemini CLI |
| **Remote (http)** | Connects to Moxn's servers | Claude.ai, ChatGPT, Gemini, Claude Cowork, ChatGPT Desktop |
**Local is better when available.** It supports all features including file uploads, and keeps data flowing through your machine.
**Remote is required for web and cloud environments.** Web apps and cloud VMs can't execute local commands. The `upload_url` tool doesn't work reliably in remote mode.
### Using Multiple AI Assistants
If you use several AI tools (e.g., Claude Code on your laptop and Claude.ai in the browser), you can configure both connections. Use different server names so each tool knows which to use:
```json theme={null}
{
"mcpServers": {
"context": {
"type": "stdio",
"command": "npx",
"args": [
"@moxn/mcp-kb",
"--workspace=your-workspace-slug"
]
},
"context-remote": {
"type": "http",
"url": "https://your-workspace-slug.moxn.dev/api/mcp/http"
}
}
}
```
## Step 3: Authenticate
The first time you use Moxn Documents with your AI:
1. Ask your AI something like "List my Moxn documents"
2. A browser window will open for authentication
3. Sign in with your Moxn account
4. Return to your AI assistant
Your session persists across restarts — you only need to authenticate once.
## Try It Out
Once connected, try these prompts with your AI:
**Discover what's available:**
> "What documents do I have in Moxn?"
> "Search for anything about authentication"
**Read documents:**
> "Read the API documentation from Moxn"
**Create content (on a branch):**
> "Create a new document called 'Meeting Notes' with today's discussion points"
> "Update the onboarding guide to include the new security requirements"
Your AI will create a branch for any changes. You can review and merge in the Moxn web app.
**Bringing in many existing docs?** MCP writes are best for a handful of docs at a time. For bulk imports from Notion, local markdown, or CSVs, use [Import & Export](/migration/index) instead — there's an in-app Notion integration and a CLI for everything else.
**Multiple filesystems:** If your workspace has more than one [filesystem](/concepts/filesystems), add `--filesystems=your-slug` to the MCP args (or set `MOXN_FILESYSTEMS=slug1,slug2`) to restrict the agent to specific filesystems. Most workspaces only have one — you can skip this.
## Troubleshooting
* Make sure you saved the config file and restarted Claude Desktop completely (not just closed the window)
* Check that the JSON is valid (no trailing commas, matching braces)
* On Mac, you can find the config file at `~/Library/Application Support/Claude/claude_desktop_config.json`
* On Windows, it's at `%APPDATA%\Claude\claude_desktop_config.json`
* Make sure your default browser isn't blocking popups from Moxn
* Try running the MCP server manually to see errors: `npx @moxn/mcp-kb --workspace=your-workspace-slug`
You need Node.js installed. Download it from [nodejs.org](https://nodejs.org) (choose the LTS version).
After installing, restart your terminal/computer and try again.
**Local (stdio)** — runs on your machine via `npx`:
```json theme={null}
{
"mcpServers": {
"context": {
"type": "stdio",
"command": "npx",
"args": [
"@moxn/mcp-kb",
"--workspace=your-workspace-slug"
]
}
}
}
```
**Remote (http)** — connects directly to Moxn's servers:
```json theme={null}
{
"mcpServers": {
"context": {
"type": "http",
"url": "https://your-workspace-slug.moxn.dev/api/mcp/http"
}
}
}
```
## Step 2: Add to Your AI Assistant
Choose your assistant below:
Claude.ai supports MCP servers through its Integrations settings.
1. Go to [claude.ai](https://claude.ai)
2. Click your **profile icon** → **Settings** → **Integrations**
3. Click **Add Integration** and select **MCP**
4. Enter the remote URL:
```
https://your-workspace-slug.moxn.dev/api/mcp/http
```
5. Save the integration
Replace `your-workspace-slug` with your actual workspace slug (visible in your Moxn dashboard URL).
Once connected, you can use Moxn tools in any Claude.ai conversation.
ChatGPT supports MCP connectors through its settings.
**Requires a Plus or Pro subscription** with developer mode enabled.
1. Go to [chatgpt.com](https://chatgpt.com)
2. Open **Settings** → **Apps & Connectors** → **Advanced settings**
3. Enable **Developer mode**
4. Click **Create** under connectors
5. Fill in:
* **Name**: `Moxn Documents`
* **Description**: `Search, read, and write documentation`
* **URL**: `https://your-workspace-slug.moxn.dev/api/mcp/http`
6. Save the connector
Replace `your-workspace-slug` with your actual workspace slug.
To use it, click the **+** button in a new chat, select **More**, then choose **Moxn Documents** from your connectors.
**Limitation:** The `upload_url` tool is not fully supported with remote connections. Avoid file uploads when using ChatGPT.
Google Gemini supports MCP through Google AI Studio.
1. Go to [aistudio.google.com](https://aistudio.google.com)
2. Open a project and go to **Tools** → **MCP Servers**
3. Add a new server with the remote URL:
```
https://your-workspace-slug.moxn.dev/api/mcp/http
```
4. Save the configuration
Replace `your-workspace-slug` with your actual workspace slug.
Claude Cowork runs in a cloud VM that cannot execute local commands like `npx`. Use the remote HTTP connection instead:
```json theme={null}
{
"mcpServers": {
"context": {
"type": "http",
"url": "https://your-workspace-slug.moxn.dev/api/mcp/http"
}
}
}
```
Replace `your-workspace-slug` with your actual workspace slug (visible in your Moxn dashboard URL).
**Limitation:** The `upload_url` tool is not fully supported in HTTP mode. Avoid file uploads when using Claude Cowork.
Add the configuration to `.mcp.json` in your project root:
```json theme={null}
{
"mcpServers": {
"context": {
"type": "stdio",
"command": "npx",
"args": [
"@moxn/mcp-kb",
"--workspace=your-workspace-slug"
]
}
}
}
```
Claude Code will automatically detect and connect to the server.
Add the configuration to your Cursor MCP settings:
1. Open Cursor
2. Go to **Settings** → **MCP**
3. Click **Add new MCP server**
4. Add this configuration:
```json theme={null}
{
"mcpServers": {
"context": {
"type": "stdio",
"command": "npx",
"args": [
"@moxn/mcp-kb",
"--workspace=your-workspace-slug"
]
}
}
}
```
Cursor will automatically connect to the server.
### Mac
1. Open Claude Desktop
2. Click **Claude** in the menu bar → **Settings**
3. Select the **Developer** tab
4. Click **Edit Config**
This opens `claude_desktop_config.json` in your text editor. If the file is empty or just has `{}`, replace it with your configuration from Step 1.
If you already have other MCP servers configured, add the `"context"` entry inside the existing `mcpServers` object:
```json theme={null}
{
"mcpServers": {
"existing-server": { ... },
"context": {
"type": "stdio",
"command": "npx",
"args": [
"@moxn/mcp-kb",
"--workspace=your-workspace-slug"
]
}
}
}
```
5. Save the file
6. Quit and reopen Claude Desktop
### Windows
1. Open Claude Desktop
2. Click the **hamburger menu** (☰) → **Settings**
3. Select the **Developer** tab
4. Click **Edit Config**
This opens `claude_desktop_config.json` in Notepad. Add your configuration as described above.
5. Save the file
6. Close and reopen Claude Desktop
### Verify It's Working
After restarting Claude Desktop, you should see a **hammer icon** in the bottom-right corner of the chat window. This indicates MCP servers are connected.
Click the **+** button at the bottom of the chat, then select **Connectors** to see your connected servers.
ChatGPT Desktop uses a GUI-based setup instead of a config file.
**Requires Developer Mode.** You'll need a ChatGPT Plus or Pro subscription with developer mode enabled.
1. Open ChatGPT Desktop
2. Go to **Settings** → **Apps & Connectors** → **Advanced settings**
3. Enable **Developer mode**
4. Click **Create** under connectors
5. Fill in:
* **Name**: `Moxn Documents`
* **Description**: `Search, read, and write documentation`
* **URL**: `https://your-workspace-slug.moxn.dev/api/mcp/http`
6. Save the connector
Replace `your-workspace-slug` with your actual workspace slug (visible in your Moxn dashboard URL).
To use it, click the **+** button in a new chat, select **More**, then choose **Moxn Documents** from your connectors.
**Limitation:** The `upload_url` tool is not fully supported with remote connections. Avoid file uploads when using ChatGPT Desktop.
The Gemini CLI supports MCP servers through its configuration file.
1. Create or edit `~/.gemini/settings.json`
2. Add the MCP server configuration:
```json theme={null}
{
"mcpServers": {
"context": {
"command": "npx",
"args": [
"@moxn/mcp-kb",
"--workspace=your-workspace-slug"
]
}
}
}
```
See the [Gemini CLI MCP documentation](https://geminicli.com/docs/tools/mcp-server/) for more details.
For other MCP-compatible tools, you'll need either:
**Local connection** (if your tool can run `npx`):
```json theme={null}
{
"mcpServers": {
"context": {
"type": "stdio",
"command": "npx",
"args": ["@moxn/mcp-kb", "--workspace=your-workspace-slug"]
}
}
}
```
**Remote connection** (if your tool runs in a VM or browser):
```json theme={null}
{
"mcpServers": {
"context": {
"type": "http",
"url": "https://your-workspace-slug.moxn.dev/api/mcp/http"
}
}
}
```
Not sure which to use? See [Understanding Connection Types](#understanding-connection-types) below.
## Understanding Connection Types
Not sure which setup to use? Here's the difference:
| Type | How It Works | Apps That Use It |
| ----------------- | ------------------------------ | ---------------------------------------------------------- |
| **Local (stdio)** | Runs on your machine via `npx` | Claude Code, Cursor, Claude Desktop, Gemini CLI |
| **Remote (http)** | Connects to Moxn's servers | Claude.ai, ChatGPT, Gemini, Claude Cowork, ChatGPT Desktop |
**Local is better when available.** It supports all features including file uploads, and keeps data flowing through your machine.
**Remote is required for web and cloud environments.** Web apps and cloud VMs can't execute local commands. The `upload_url` tool doesn't work reliably in remote mode.
### Using Multiple AI Assistants
If you use several AI tools (e.g., Claude Code on your laptop and Claude.ai in the browser), you can configure both connections. Use different server names so each tool knows which to use:
```json theme={null}
{
"mcpServers": {
"context": {
"type": "stdio",
"command": "npx",
"args": [
"@moxn/mcp-kb",
"--workspace=your-workspace-slug"
]
},
"context-remote": {
"type": "http",
"url": "https://your-workspace-slug.moxn.dev/api/mcp/http"
}
}
}
```
## Step 3: Authenticate
The first time you use Moxn Documents with your AI:
1. Ask your AI something like "List my Moxn documents"
2. A browser window will open for authentication
3. Sign in with your Moxn account
4. Return to your AI assistant
Your session persists across restarts — you only need to authenticate once.
## Try It Out
Once connected, try these prompts with your AI:
**Discover what's available:**
> "What documents do I have in Moxn?"
> "Search for anything about authentication"
**Read documents:**
> "Read the API documentation from Moxn"
**Create content (on a branch):**
> "Create a new document called 'Meeting Notes' with today's discussion points"
> "Update the onboarding guide to include the new security requirements"
Your AI will create a branch for any changes. You can review and merge in the Moxn web app.
**Bringing in many existing docs?** MCP writes are best for a handful of docs at a time. For bulk imports from Notion, local markdown, or CSVs, use [Import & Export](/migration/index) instead — there's an in-app Notion integration and a CLI for everything else.
**Multiple filesystems:** If your workspace has more than one [filesystem](/concepts/filesystems), add `--filesystems=your-slug` to the MCP args (or set `MOXN_FILESYSTEMS=slug1,slug2`) to restrict the agent to specific filesystems. Most workspaces only have one — you can skip this.
## Troubleshooting
* Make sure you saved the config file and restarted Claude Desktop completely (not just closed the window)
* Check that the JSON is valid (no trailing commas, matching braces)
* On Mac, you can find the config file at `~/Library/Application Support/Claude/claude_desktop_config.json`
* On Windows, it's at `%APPDATA%\Claude\claude_desktop_config.json`
* Make sure your default browser isn't blocking popups from Moxn
* Try running the MCP server manually to see errors: `npx @moxn/mcp-kb --workspace=your-workspace-slug`
You need Node.js installed. Download it from [nodejs.org](https://nodejs.org) (choose the LTS version).
After installing, restart your terminal/computer and try again.